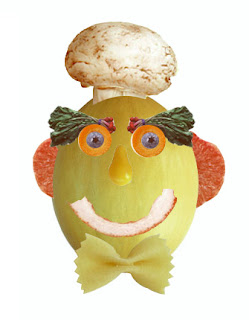
 For our introduction to Photoshop, our first activity was to create the Melon Head. This activity allowed us to practice the basic tools of Photoshop. We began this lesson by opening a file that had separate pictures of fruit and vegetables, in which as the final product, became the Melon Head. The Melon Head consisted of 1 mushroom for the hat, 2 carrots for the eyes, 2 grapefruits for the ears, 1 pasta bow for the bow tie, 2 blueberries for the eyes, 2 beets for the eyebrows,1 pear for the nose, and 1 melon for the head. Originally the mouth was supposed to be a kiwi, but since we were allowed to make one alteration, I chose to make the mouth a grapefruit peel.
 The tools that we used in this activity were the elliptical marquee tool, and the lasso tool. The elliptical marquee tool was used to select objects, specifically oval or circular shaped images. In this case, we used this tool to select images such as the blueberries and the carrots. To perfectly select a circular object, you must place this tool at the outer surface of the carrot or blueberry. You can adjust the size of the selection according to the size of the image. Once this was done a new layer for each fruit or vegetable must be created, in order for you to be able to move each object separately. To move the selected object, you must click on the move tool, then click on the object to move it to the desired place. For irregular objects such as the bow tie or the grapefruit, the lasso tool must be used. This tool allows you to select or "cut" out objects that are not circular because it gives you the freedom to outline the image however you would like to. Since the ears and the eyebrows both were on the left and right side of the melon, the duplicate had to be flipped. In order to do this you must select the object, then click "edit">"free transform">"flip". You can flip the object at any degree, such as 90 degrees. Finally images such as the ears must be placed behind the head, therefore you must move this layer underneath the layer of the head, because layers at the bottom of the list appear the farthest away, such as the ears, and layers at the top of the list appear the closest.
In conclusion, with the use of all these tools, I was able to create the desired image called the Melon Head, and it was saved onto my documents.
9.8/10 excellent work
ReplyDelete