Sunday, February 20, 2011

Lesson 4: Logo

 This was our fourth lesson for the basics of Photoshop. We began the assignment with a plain cardboard box image. To place the logo we clicked on file>place>then place the "logo". We then used the move tool to situate the logo in the proper placement and changed it to a reasonable size.

    We then used the lasso tool by clicking lasso tool>polygonal lasso tool and then we traced or outlined the top side of the box from vertex to vertex. We then clicked edit>cut and edit>paste, this separated the top half of the logo from the bottom half. We then created a new layer and named it "top" for the top half of the logo. To make the logo appear bent, we clicked on image>transform>distort. With this application we were able to stretch and manipulate the logo, making it appear folded onto the box.

   For the final adjustments, we changed the opacity of the top layer to 60% and changed the bottom layer by clicking Multiply and changing the opacity to 70%. The image was now complete and appeared bent to our eyes. We then saved our work in our documents as a JPEG image.

Lesson 3: Clock


This was the third lesson that we learned for the basics of Photoshop. This lesson was fun because we got to use the gradient tool and the text tool to play around with the colours and our name.

   We began the lesson by creating a new layer, this layer was named "gradient". Then we clicked on the gradient tool which is the grey rectangle that is situated in the tool column. Then to create the purple colour in the background, we clicked on gradient window>gradient editor. To choose the colour, we clicked on the colour stop and colour picker, and changed the colour blue to purple. To apply this colour that we choose, we had to make a line on the keyboard image and changed the opacity to 25%.

      Once we had the image changed into the colour that we wanted, the clock file was opened. Then to paste the clock onto the assignment, we had to press control A (select the clock)>edit>paste onto the assignment. To edit the clock, we used the magic tool to delete the white area , making the clock appear hollow. For more effects, we changed the option of "normal" to "screen", to make the clock appear as if it were glowing. We then used the text tool to add my name onto the image. We clicked on the text effects under the heading "Artwork and Effects" and we were able to manipulate the font and size of our name. We then placed our name in the top left corner using the move tool.

    Finally, our last step was to add on the gauge and the bearing by clicking on the layer, and then we moved the bearing layer above the gradient layer. Then we saved our work as a JPEG file.


Friday, February 18, 2011

Lesson 2: Boat in Venice

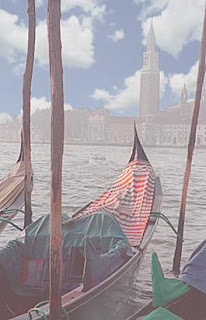
This was our second lesson for learning the basics of Photoshop. For this activity, I was absent, although I did catch up on our work period day. I began by cropping the picture of the boat in Venice by using the crop tool. With this tool I was able to select the painting and remove the black background. Next, I used the spot healing tool to erase the objects not needed in the final project, such as the small boat in the background. I then adjusted the lighting by using the tonal range and clicking on Enhance>Adjust Lighting>Levels. I placed the arrows closer towards the end of the black graph to create the same lighting as the final product.

Once I adjusted the tonal range, I used the sponge tool, changed the size to 18 px and clicked on "saturate". This was used by dabbing on the cast to make the striped pattern on the boat appear brighter, as if the sun was reflecting on it. After that I right clicked on the sponge tool, selected the dodge tool and used this by dabbing it underneath the boat to make it appear as if it was reflecting off of the water. Once the original image was adjusted, alterations were made such as adding the clouds. To do this I had to first open the clouds file and then select the clouds, then I used the magic wand tool along with pressing the shift key to select parts of the sky in the original image. To paste the clouds onto the original image, I had click edit and copy on the clouds, and edit and paste to paste the clouds onto the original image, replacing the original sky. The opacity of the clouds was changed in order for it to appear less bold and blend with image

The final adjustment was to change the color of the bottom right hand orange object to the color of dark green. To do this, in the layers palette, I selected the background and then selected the zoom tool to zoom into the tarp. Then I held the mouse down on the crop tool, and dragged it to select the rectangle marquee tool to drag a selection around the tarp.  To replace the color I clicked on enhance> adjust>replace color. I then clicked on the eye dropper tool in the dialogue box and clicked on the orange tarp. I adjusted the tolerance level by moving the fuzziness slider to 61. I then dragged the hue slider to 149, the saturation to -17, and finally the lightness to -39. With all of these adjustments made, I was able to create the new image of the Boat in Venice.

Lesson 1: Melon Head

       For our introduction to Photoshop, our first activity was to create the Melon Head. This activity allowed us to practice the basic tools of Photoshop. We began this lesson by opening a file that had separate pictures of fruit and vegetables, in which as the final product, became the Melon Head. The Melon Head consisted of 1 mushroom for the hat, 2 carrots for the eyes, 2 grapefruits for the ears, 1 pasta bow for the bow tie, 2 blueberries for the eyes, 2 beets for the eyebrows,1 pear for the nose, and 1 melon for the head. Originally the mouth was supposed to be a kiwi, but since we were allowed to make one alteration, I chose to make the mouth a grapefruit peel.  


      The tools that we used in this activity were the elliptical marquee tool, and the lasso tool. The elliptical marquee tool was used to select objects, specifically oval or circular shaped images. In this case, we used this tool to select images such as the blueberries and the carrots. To perfectly select a circular object, you must place this tool at the outer surface of the carrot or blueberry. You can adjust the size of the selection according to the size of the image. Once this was done a new layer for each fruit or vegetable must be created, in order for you to be able to move each object separately. To move the selected object, you must click on the move tool, then click on the object to move it to the desired place. For irregular objects such as the bow tie or the grapefruit, the lasso tool must be used. This tool allows you to select or "cut" out objects that are not circular because it gives you the freedom to outline the image however you would like to. Since the ears and the eyebrows both were on the left and right side of the melon, the duplicate had to be flipped. In order to do this you must select the object, then click "edit">"free transform">"flip". You can flip the object at any degree, such as 90 degrees. Finally images such as the ears must be placed behind the head, therefore you must move this layer underneath the layer of the head, because layers at the bottom of the list appear the farthest away, such as the ears, and layers at the top of the list appear the closest.


In conclusion, with the use of all these tools, I was able to create the desired image called the Melon Head, and it was saved onto my documents.


Thursday, February 3, 2011

MADD Presentation

This presentation was directed to both legal and illegal drinking. It consisted of real life stories, and people who spoke about their past experiences from friends and family members. MADD presents a serious issue in which teens should take in to consideration because it involves the safety of not only the teens themselves but also those who are around them. After the watching the presentation, I felt the intimate and emotional experiences that the people in the video felt. This is because they spoke about issues that are relevant to everyone. Though some cannot relate to this video in which they did not have the same experience, it does affect them in which they can save the lives of themselves and others by making decisions ahead of time, and by making responsible decisions to not drink and drive. In order to stay safe, teens have choices such as calling a cab, calling a sober driver, calling a parent or a responsible friend or guardian to bring them home. If these responsible choices are not made, the teen may result in riding in a different vehicle that will not be taking them home, such as an ambulance. After watching the video, I felt engaged to spread the word about driving responsibly. I knew that in order to keep everyone safe, including yourself, teens must make decisions while knowing the consequences. In conclusion, to keep teens safe they must keep in mind that drinking and driving is irresponsible, even if you are not the one driving, because part of that responsible decision is to not take a risk by getting into a car as a passenger with a drunk driver.