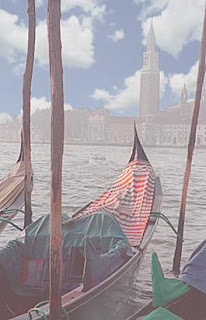
 This was our second lesson for learning the basics of Photoshop. For this activity, I was absent, although I did catch up on our work period day. I began by cropping the picture of the boat in Venice by using the crop tool. With this tool I was able to select the painting and remove the black background. Next, I used the spot healing tool to erase the objects not needed in the final project, such as the small boat in the background. I then adjusted the lighting by using the tonal range and clicking on Enhance>Adjust Lighting>Levels. I placed the arrows closer towards the end of the black graph to create the same lighting as the final product.
Once I adjusted the tonal range, I used the sponge tool, changed the size to 18 px and clicked on "saturate". This was used by dabbing on the cast to make the striped pattern on the boat appear brighter, as if the sun was reflecting on it. After that I right clicked on the sponge tool, selected the dodge tool and used this by dabbing it underneath the boat to make it appear as if it was reflecting off of the water. Once the original image was adjusted, alterations were made such as adding the clouds. To do this I had to first open the clouds file and then select the clouds, then I used the magic wand tool along with pressing the shift key to select parts of the sky in the original image. To paste the clouds onto the original image, I had click edit and copy on the clouds, and edit and paste to paste the clouds onto the original image, replacing the original sky. The opacity of the clouds was changed in order for it to appear less bold and blend with image
The final adjustment was to change the color of the bottom right hand orange object to the color of dark green. To do this, in the layers palette, I selected the background and then selected the zoom tool to zoom into the tarp. Then I held the mouse down on the crop tool, and dragged it to select the rectangle marquee tool to drag a selection around the tarp. To replace the color I clicked on enhance> adjust>replace color. I then clicked on the eye dropper tool in the dialogue box and clicked on the orange tarp. I adjusted the tolerance level by moving the fuzziness slider to 61. I then dragged the hue slider to 149, the saturation to -17, and finally the lightness to -39. With all of these adjustments made, I was able to create the new image of the Boat in Venice.
9.8/10 well done
ReplyDelete